RSS

Search Engine

Sunday, March 21, 2010

Add Prayer Times widget to blog

Hi Readers! are you a moslem? want to add a prayer times to your blog? All right... you can do that. You can add a prayer times widget to your blog very easy and that all is free.

Where are we can get the “Prayer times widget”? There are a lot of site provide this service, one of them is http://www.islamicfinder.org. Below are the steps to adding prayer times widget to your blog.

  1. Please check out http://www.islamicfinder.org.

  2. Go to the bottom page. Click at Add new service to your site.

  3. Refers to the no.2. Click at the Drop down menu with Select a Country text.

  4. Choose your country name and then click Go button. Example : Indonesia.

  5. Choose your city. Example : Jakarta.

  6. Click Generated Code.

  7. Copy all of the code and then paste at the notepad or another text editor. Save at your PC.

  8. Done.


That is the steps to get a “prayer times widget” from http://www.islamicfinder.org. Next steps are, how adding the prayer times widget code to your blog. Here’s the steps :

For Classic Template (if you are still using old template)

  1. Login to Blogger with your ID.

  2. At the dashboard page, click Template.

  3. Click Edit HTML.

  4. Don't forget to back up your template code.

  5. Go to your sidebar code.

  6. Copy the Prayer times widget code at the notepad and paste at your sidebar code.

  7. Click Save Changes template button.

  8. Done.


For New Blogger template (if you using new blogger template (beta/xml))

  1. Login to Blogger with your ID.

  2. At the dashboard page, click Layout.

  3. Click Page Elements tab.

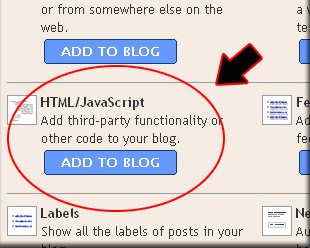
  4. Click Add a Page element.

  5. Click ADD TO BLOG for HTML/jacaScript.

  6. Copy the Prayer times widget code at the notepad and paste.

  7. Click Save Change button.

  8. Done.


The example of Prayer times Widget :

vertical widget :


horizontal widget :


Let's give it a try!

Built Your Readers Community With Mybloglog

mybloglog One of most important at blogging is building a community, with community you will be a profesional blogger. To build your blog readers community you can use mybloglog, also with mybloglog you can track your visitor because the photo of your readers will be display at your mybloglog widget (if your visitor is the member of mybloglog to). The other reason why you must join to mybloglog is you can increse your visitor.

Did you want to join with mybloglog? Remember, now mybloglog is the family of Yahoo.com, so you must have a yahoo account. Not yahoo account? please Sign Up here!. Already have a yahoo ID? please Sign in here! and get the widget of mybloglog such as the widget below :


Add an Online Game to Blog

Hi guys! Somebody ask to me " how to add an online game to blog? ". Is this impossible? My answer is you can add an online game to your blog very easy. Did you want to know how to add an onle game to blog? Please read my tutorial untill end.

If you want to add a game to your blog, you can find a free game provider at the intenet, Please googling. For example, one of a free game provider is http://www.khemer.com. The example game from khemer.com is :


Feel interesting to add a game to your blog? Below is the steps :

Step #1
  1. Please check out http://www.khemer.com.

  2. Please take a look the games, click at the title from the game.

  3. Go to the bottom page, find Add this game to your blog FREE!.

  4. Copy the html code at the text area and paste to notepad or another text editor.

  5. Close the page (if you want).


Step #2

  1. Login to blogger with your ID.

  2. In the dashboard page, click Layout.

  3. Click Page Element tab.

  4. Click Add a Page Element.

  5. Click Add to blog for HTML/Javascript. Refer to picture below :

    javascript

  6. Open your game code at the notepad, copy and then paste.

  7. Click SAVE CHANGES button.

  8. Move the element to the place would you want.

  9. Click Save button.

  10. Done. Now you have an Online Game at your blog.


That was very easy right!

Install More-Smilies Emoticons To Post Editor

Several weeks ago, I'm have been posting about installing yahoo emoticons and onion emoticons to post editor likely at this post and this post. Now I will add you different emoticons, named with More-Smilies Emoticons. What I write to you below is the real of more-smilies emoticons:


emoticon love emoticon ngegaya


Feel interested in adding more-Smilies emoticons in your blog? Just read this tutorial until end. However, Please remember this tutorial is only work for FireFox browser and and not for Internet Explorer or other browser. So, please use FireFox browser to read this post. One thing you must remember too, the emoticons will be appear only at Compose tab and not for Edit HTML tab. All right, bellow are the steps to installing more-smilies to blogger post editor :

If you have been do my previous tutorial at this post or at this post. Just Click here! and then click Install button and you’re done. Now see your post editor, and you will see your post editor like this :


more-smiles emoticon


Still comfused? Allright, bellow is the completed tutorial :

  1. You must used Firefox browser when you following this tutorial. Not yet have Firefox? don't worry, you can download at this blog for free, please click the button below :

  2. Open your Firefox browser

  3. Install GreasMonkey, please click here!

  4. Click this script, and then click install.

  5. Go to your template editor, and find this code ]]>

  6. Copy and paste following codes above of ]]> img.emoticon {
    padding: 0;
    margin: 0;
    border: 0;
    }
  7. Click Save Template button.
  8. Now you’re done. Now your post editor was added with more-smilies emoticons.

Adding an Image Beside Post Title

Don’t you want your blog look beauty? Maybe you can add several accessories. One of them is adding a small image beside post title, for example : please take a look the image below :

post title

How to adding a small image at the post title? here is the steps.

Step #1

You must have a small image image, for example like this :

my pencil

Step #2

Upload your small image to image hosting. For example : you can upload your image to blogger, Yahoo geocities, Google pages, or another free image hosting. If you has been uploading your image, please get the image code. for example : I'm has been upload an image to Blogger and the image code is :

https://blogger.googleusercontent.com/img/b/R29vZ2xl/AVvXsEgQ1wusAzK62wtBgO53sQZpgjeJwwoyilTnmYnC6Idxiyt0PWasezfTrWAcu9-LA8TGESlKrYpcfpmAvjagI5GAVu35No7VJISfdN0vRkiNjSLVI1LFYWDqq62PUSjFak0f4STgk2kMM5s/s400/mypencil.jpg

So that the picture can appear at your blog, you must create the code like this :


And the image will appear like this :


Step #3

Add the image code to your template code. Here are the steps to add image code to your blog.


Or, do you still using old (classic) template? Never mind, bellow is the steps adding image code to classic template :

  1. Login to blogger with your ID.

  2. At the dashboard page, click Template.

  3. Click Edit HTML.

  4. Back up your template code (important!).

  5. Find this code :


  6. Replace your image code beside above code :


  7. Click Save Settings button.

  8. Done. Now your every post title will appear with your small image.


This is for new blogger template (beta template) :

  1. Login to Blogger with your ID.

  2. At the dashboard page, click Layout.

  3. Click Edit HTML.

  4. Back Up your template code (important!).

  5. Please mark the little box beside Expand Widget Template. Wait for a moment


    expand-widget.png


  6. Go to your template code, and find the code like this :


  7. Add your image code like this :


  8. Click SAVE TEMPLATE button.

  9. Done. Now your every post title will appear with your small image.


All right brothers, see you at my next tutorial.

Adding Live Traffic Tracking Tool to Blog

Want to know where are your visitor come from for live? If yes, you can add blog tool from http://feedjit.com. With web or blog tool from http://feedjit.com, you can know your visitor come from. Easy install to blog and without signup before, grab the code and add to your sidebar and you have a live tracking tool for free.

Below is the example widget from feedjit.com :

Live Traffic Feed
Ahmadabad, Gujarat arrived from blogspottutorial.com on "Adding Live Traffic Tracking Tool to Blog | Blogging Tutorial, Free Templates and Sites Info"
Europe arrived from google.com on "Adding Live Traffic Tracking Tool to Blog | Blogging Tutorial, Free Templates and Sites Info"
Bonn, Nordrhein-Westfalen arrived from google.co.in on "Adding Live Traffic Tracking Tool to Blog | Blogging Tutorial, Free Templates and Sites Info"
Skiatook, Oklahoma arrived from google.com on "Adding Live Traffic Tracking Tool to Blog | Blogging Tutorial, Free Templates and Sites Info"
La Coruña, Galicia arrived from google.es on "Adding Live Traffic Tracking Tool to Blog | Blogging Tutorial, Free Templates and Sites Info"
Rawalpindi, Punjab left "Adding Live Traffic Tracking Tool to Blog | Blogging Tutorial, Free Templates and Sites Info" via bgames.com
Rawalpindi, Punjab arrived from blogspottutorial.com on "Adding Live Traffic Tracking Tool to Blog | Blogging Tutorial, Free Templates and Sites Info"
Leicester arrived from blogspottutorial.com on "Blogging Tutorial, Free Templates and Sites Info: blogger template"
Karachi, Sindh left "Adding Live Traffic Tracking Tool to Blog | Blogging Tutorial, Free Templates and Sites Info" via feedjit.com
Karachi, Sindh arrived from google.com.pk on "Adding Live Traffic Tracking Tool to Blog | Blogging Tutorial, Free Templates and Sites Info"


This is the steps to add widget Live Traffic Feed to your blog :

  1. Login to blogger with your ID.

  2. At the dashboard, click Layout.

  3. Click Page Element tab.

  4. Click Add a Page Element.

  5. Click ADD TO BLOG for HTML/Javascript.

  6. Copy and then paste the following code :

  7. Click SAVE CHANGES button.

  8. Done. Now you have a tool for tracking your visitor come from.


Now you have a tool to track your visitor.

See you later at my next tips.